WQWebDMR Help Page
|
Please select the help section you need:
|
|
Account Sign Up
|
DMR Data Entry
|
DMR Other
|
|
Permit
|
Monitoring Point
(Construction and Industrial Stormwater permits
only)
|
Miscellaneous
|
|
Sign Up For WQWebDMR
|
In order to sign up for WQWebDMR, you need to complete the following steps:
- Create a SecureAccess Washington (SAW) account at https://secureaccess.wa.gov/.
- Within SAW, apply for access to the Water Quality Permitting Portal (WQWebPortal) service.
- Click on the "Discharge Monitoring Report (DMR)" link on the WQWebPortal home page.
- Select which role you will use to enter electronic DMRs, either Facility Coordinator,
Facility Preparer, Facility Signer, or Administrator.
- Click on the "Continue" button.
- If you selected the Facility Preparer or Administrator role, then you will need to wait for access from
a Facility Coordinator or will be automatically approved if a Facility Coordinator
has granted you access.
- If you selected the Facility Coordinator or Facility Signer role, you will need
to create an electronic signature account. This account gives you the ability to
legally submit electronic DMRs to Washington State Department of Ecology.
- Select a user name and password for your electronic signature account.
- Select and answer five security questions.
- Enter your name, email, and phone number to finish the electronic signature account
creation.
- Click on the "Continue" button.
- (Facility Coordinator & Facility Signers only) Search and click on the "Select" link for the permits
you will need to access in WQWebDMR. The permits will be verified before you are granted
access.
- Click on the "Continue" button.
- To complete the electronic signature account creation, check your email for a message
sent from CROMERRUserNotification@DoNotReply.gov.
- Open the electronic signature agreement attached to the email.
- Complete and mail in the electronic signature agreement to the address specified
at the bottom of the form.
- Wait for your approval email(s).
- Once you have received your approval email from CROMERRUserNotification@DoNotReply.gov,
click on the link supplied in the email to complete the approval.
- Log into your Secure Access Washington (SAW) account.
- You should be directed to the "Electronic Signature Account Activation" page.
|
Return to Top
|
Create an electronic signature account
|
If you selected the Facility Coordinator or Facility Signer role, you will need
to create an electronic signature account. This account gives you the ability to
legally submit electronic DMRs to Washington State Department of Ecology.
Learn more
- Select a user name and password for your electronic signature account.
- Select and answer five security questions.
- Enter your name, email, and phone number to finish the electronic signature account
creation.
- Click on the "Continue" button.
- (Facility Coordinator only) Search and click on the "Select" link for the permits
you will need to access in WQWebDMR. The permits will be verified before you are granted
access.
- Click on the "Continue" button.
- To complete the electronic signature account creation, check your email for a message
sent from CROMERRUserNotification@DoNotReply.gov.
- Open the electronic signature agreement attached to the email.
- Complete and mail in the electronic signature agreement form to the address specified
at the bottom of the form.
- Wait for your approval email(s).
- Once you have received your approval email from CROMERRUserNotification@DoNotReply.gov,
click on the link supplied in the email to complete the approval.
- Log into your Secure Access Washington (SAW) account.
- You should be directed to the "Electronic Signature Account Activation" page.
|
Return to Top
|
Change electronic signature account password
|
If you need to change your electronic signature account password or you receive
an email requiring you to change a temporary password, please follow the steps below.
- From the WQWebDMR home page, click on the "My Signature Account" tab.
- Click on the "Change My Password" link.
- Enter your electronic signature account user name, your old password or temporary
one from the email, and your new password.
- Click on the "Submit Change Password Request" button.
- Answer the security question.
- Click on the "Continue" button.
- Click on the "Done Viewing" button.
- Try to log into your electronic signature account with your new password.
- A change password confirmation email will be sent to you from CROMERRUserNotification@DoNotReply.gov.
|
Return to Top
|
Select a permit
|
If you selected the Facility Coordinator or Facility Signer role, then you need to select which permits
you need access to.
- Click on the "Select Permits" tab.
- Enter your search criteria into the text boxes
- Click on the "Search" button.
- Click on the "Select" link in the permit row you are interested in.
- Repeat search and selecting until you find all of your permits.
Search Tips -
If you can't find the permit you are looking for, try these options:
- Broaden your search - fill in only one or two search criteria boxes.
- Partial text - use the last four digits of your permit number (no dashes) or just
your building numbers in the address text box.
- Combination - use a combination of the two suggestions.
If you still can't find your permit, then please contact the Department of Ecology's Water Quality help staff for
your region or section.
|
Return to Top
|
Remove a selected permit
|
If you accidentally selected a permit and you are still on the Select Permits page.
- Click on the "My Permits" tab.
- Click on the "Remove" link in the permit row you want to remove.
If you no longer have access to the Select Permits page, then you should send an
email to the appropriate Washington State Department of Ecology region via the Contact us page.
|
Return to Top
|
Request access to additional Permits
|
If you are a Facility Preparer or Administrator, you need to contact that permit's
Facility Coordinator. Washington State Department of Ecology can only grant
you access if they have received a communication from the Facility Coordinator for
that permit.
If you are a Facility Coordinator or Facility Signer, you may use the
Request Permit Access page to search for and request additional permits.
If you need to upgrade your active account from Facility Preparer or Administrator and don't have
a Facility Coordinator, then please contact the
Department of Ecology's Water Quality help staff for your region
or section for more detailed information.
|
Return to Top
|
Assign users to a permit
|
As a Facility Coordinator or Administrator, you are in charge of granting other users access to your
permits. In order to let other users work on your DMRs you need to:
- From the "Home" page, click on the "Assign Users" tab.
- Click on the "Assign Users" link in the appropriate permit row.
- Enter the name and email address of the person you want to add.
- Select a user role to give the entered person.
- Click on the "Add" link.
|
Return to Top
|
Select a user role
|
When you grant a person access to your permit, they can access all of your DMRs
for that permit. As a Facility Coordinator or Administrator, you need to decide what level of access
you want to grant them. There are four different roles you can assign the people
you add. They are:
- Facility Coordinator - A person with this role will be able to do everything
you can do. Assign new people, electronically sign DMRs, and prepare DMRs for the
permit you assign them.
- Facility Preparer - This role will only allow the person to prepare DMRs
on your behalf. They will not be able to assign new people or electronically
sign DMRs.
- Facility Signer - With this role, a person can prepare and electronically
sign DMRs. They will not be able to assign new people to the permit.
- Administrator - A person with this role will be able to do everything
you can do (assign new people and prepare DMRs), but they cannot electronically sign DMRs for the
permit you assign them.
You may change a person's user role at any time and you may delete a person if they
are no longer performing those DMR duties.
|
Return to Top
|
Move to next outfall
|
If you have multiple active outfalls assigned to your permit, then you can move
through them one at a time on the DMR data entry screen. There are two ways to move
to the next outfall. They are:
- Select an outfall from the "Outfall" drop down list located at the top of the DMR
data entry screen. Or
- Click on the "Next Outfall" button located at the bottom of the DMR data entry screen.
This button will take you to the next outfall listed in the "Outfall" drop down
list.
If you only have one active outfall assigned to your permit, then you will only
see the one outfall in the "Outfall" drop down list and the "Next Outfall" button
will not be visible at the bottom of the DMR data entry screen.
|
Return to Top
|
Monthly data entry
|
The monthly DMR data entry form is divided into four sections:
- DMR header information - White box with black outline.
- DMR monthly samples - Table matrix of parameters and dates.
- DMR summary information - Table matrix of parameters and sample summary information
- Actions - A list of links at the bottom of the screen of actions you can
perform on the DMR.
- DMR header information -
The DMR header section contains some commonly used information so you know what
DMR you are working on. It also contains a few data entry fields that apply to the
whole DMR.
- DMR level data entry -
- Select a non-report reason for the whole DMR (all outfalls) from the "DMR Reporting
Codes" drop down list located in the DMR header information. This option applies
to the whole DMR submission and once selected, you can check the "Ready to Submit"
check box and save your DMR.
Example: You would use this option if you had no discharge for all of your outfalls
during the monitoring period.
- Add comments that pertain to the whole DMR. Click on the "Comments" link in the
DMR header information.
- DMR monthly samples -
This section of the page is the most involved part of the data entry. It includes
multiple ways to report your data and contains a lot of your factsheet information
for easy reference.
- Data entry header information -
The information in the dark blue header is available to help you fill out your DMR.
This information includes the parameter name, parameter units, fraction, and sample
frequency. Additional information about a parameter can be viewed by clicking on
the arrow that is located on the right side of the parameter name.

- Monitoring point level data entry -
This section of the data entry header information allows you to enter a comment
or non-report reason for a whole entire monitoring point.
- To select a non-report reason for a specific monitoring point, click on the
 button next to the monitoring point name in the dark blue data entry header.
- To add a comment pertaining to a specific monitoring point. Click on the same icon
specified above to reach the monitoring point comments.
If you select a non-report reason for a particular monitoring point, you cannot
enter values into the DMR value textboxes for that monitoring point.
- DMR value level data entry -
This section of the matrix consists of numerous textboxes. Each textbox corresponds
to a particular parameter and a particular date. You can verify what parameter and
date a particular textbox belongs to by hovering your mouse over the textbox. The
following actions can be performed for each textbox:
- Enter any numerical value that is under 12 characters in length.
- Enter the < or > sign directly into the textbox (i.e. < 0.05)
- Enter a comment/note against a specific DMR value. To do this, click on the
next to the textbox that you want to add a comment/note to.
- DMR summary information -
The DMR summary matrix is a table that will appear if you have summary statistics
that you need to report for your DMR (i.e. Monthly Average). This table will have
the same header (dark blue rows) as the monthly samples table, but will only contain
data entry text boxes for parameters that need a summary value reported.
The DMR summary table functions the same as the "DMR value level data entry" section
above. The following actions can be performed for each textbox:
- Enter any numerical value that is under 12 characters in length.
- Enter the < or > sign directly into the textbox (i.e. < 0.05)
- Enter a comment/note against a specific DMR summary value. To do this, click on
the
next to the text box that you want to add a comment/note to.
Also, the limit, benchmark, design limit, or report only tags are displayed under
each text box in the DMR summary table, so you have a quick reference about your
limit.
- Actions -
This section contains all of the actions you can perform against the DMR. The following
options are available:
- Save - Save what you are currently working on and stay on the screen.
- Save and Done - Save what you are working on and go back to the DMR search
screen.
- Next Outfall - If the DMR has more than one outfall, save the current screen
and move to the next outfall.
- Previous Outfall - If the DMR has more than one outfall, save the current
screen and move to the previous outfall.
- Validate - Run the validation routine to see what types of message will come
up.
- Cancel - Don't save any changes on the current screen and go back to the
DMR search screen.
- Clear - Clear all values associated with this DMR and reset the DMR status
to "Not Started".
|
Return to Top
|
Quarterly data entry
|
The quarterly DMR data entry form is divided into four sections:
- DMR header information - White box with black outline.
- DMR quarterly samples - Table matrix of parameters and dates that you add
to.
- DMR summary information - Table matrix of parameters and sample summary information
- Actions - A list of links at the bottom of the screen of actions you can
perform on the DMR.
- DMR header information -
The DMR header section contains some commonly used information so you know what
DMR you are working on. It also contains a few data entry fields that apply to the
whole DMR.
- DMR level data entry -
- Select a non-report reason for the whole DMR (all outfalls) from the "DMR Reporting
Code" drop down list located in the DMR header information. This option applies
to the whole DMR submission and once selected, you can check the "Ready to Submit"
check box and save your DMR.
Example: You would use this option if you had no discharge for all of your outfalls
during the monitoring period.
- Add comments that pertain to the whole DMR. Click on the "Comments" link in the
DMR header information.
- DMR quarterly samples -
This section of the page is the most involved part of the data entry. It includes
multiple ways to report your data and contains a lot of your factsheet information
for easy reference.
- Data entry header information -
The information in the dark blue header is available to help you fill out your DMR.
This information includes the parameter name, parameter units, fraction, and sample
frequency. Additional information about a parameter can be viewed by clicking on
the arrow that is located on the right side of the parameter name.
- Monitoring point level data entry -
This section of the data entry header information allows you to enter a comment
or non-report reason for a whole entire monitoring point.
- To select a non-report reason for a specific monitoring point, click on the
button next to the monitoring point name in the dark blue data entry header.
- To add a comment pertaining to a specific monitoring point. Click on the same icon
specified above to reach the monitoring point comments.
If you select a non-report reason for a particular monitoring point, you cannot
enter values into the DMR value textboxes for that monitoring point.
- DMR value level data entry -
This section of the matrix will consists of numerous textboxes as you add new sample
dates. Each textbox corresponds to a particular parameter and a particular date.
You can verify what parameter and date a particular textbox belongs to by hovering
your mouse over the textbox. The following actions can be performed for each textbox:
- Enter any numerical value that is under 12 characters in length.
- Enter the < or > sign directly into the textbox (i.e. < 0.05)
- Enter a comment/note against a specific DMR value. To do this, click on the
next to the textbox that you want to add a comment/note to.
To add a new sample date and values, you need to use the last row of the DMR quarterly
samples table and:
- Enter a sample date (MM/DD/YYYY) into first text box, starting from the left.
- Enter your DMR values into the text boxes that correspond to the parameters that
you have samples for.
- Click on the "Add" link at the far right of the row.
If you accidently add a date that you didn't want, then you can click on the "Remove"
link at the far right to discard the date and values.
- DMR summary information -
The DMR summary matrix is a table that will appear if you have summary statistics
that you need to report for your DMR (i.e. Monthly Average). This table will have
the same header (dark blue rows) as the monthly samples table, but will only contain
data entry text boxes for parameters that need a summary value reported.
The DMR summary table functions the same as the "DMR value level data entry" section
above. The following actions can be performed for each textbox:
- Enter any numerical value that is under 12 characters in length.
- Enter the < or > sign directly into the textbox (i.e. < 0.05)
- Enter a comment/note against a specific DMR summary value. To do this, click on
the
next to the text box that you want to add a comment/note to.
Also, the limit, benchmark, design limit, or report only tag are displayed under
each text box in the DMR summary table, so you have a quick reference.
- Actions -
This section contains all of the actions you can perform against the DMR. The following
options are available:
- Save - Save what you are currently working on and stay on the screen.
- Save and Done - Save what you are working on and go back to the DMR search
screen.
- Next Outfall - If the DMR has more than one outfall, save the current screen
and move to the next outfall.
- Previous Outfall - If the DMR has more than one outfall, save the current
screen and move to the previous outfall.
- Validate - Run the validation routine to see what types of message will come
up.
- Cancel - Don't save any changes on the current screen and go back to the
DMR search screen.
- Clear - Clear all values associated with this DMR and reset the DMR status
to "Not Started".
|
Return to Top
|
Single Sample data entry
|
The single sample DMR data entry form is divided into three sections:
- DMR header information - White box with black outline.
- DMR samples - Table matrix of parameters.
- Actions - A list of links at the bottom of the screen of actions you can
perform on the DMR.
- DMR header information -
The DMR header section contains some commonly used information so you know what
DMR you are working on. It also contains a few data entry fields that apply to the
whole DMR.
- DMR level data entry -
- Select a non-report reason for the whole DMR (all outfalls) from the "DMR Reporting
Code" drop down list located in the DMR header information. This option applies
to the whole DMR submission and once selected, you can check the "Ready to Submit"
check box and save your DMR.
Example: You would use this option if you had no discharge for all of your outfalls
during the monitoring period.
- Add comments that pertain to the whole DMR. Click on the "Comments" link in the
DMR header information.
- Record the dates that the sample was taken and results received.
- DMR samples -
This section of the page is the most involved part of the data entry. It includes
multiple ways to report your data and contains a lot of your factsheet information
for easy reference.
- Data entry header information -
The information in the dark blue header is available to help you fill out your DMR.
This information includes the parameter name, parameter units, fraction, and sample
frequency. Additional information about a parameter can be viewed by clicking on
the arrow that is located on the right side of the parameter name.
- DMR sample data entry -
This section of the matrix will consists of numerous textboxes as you add new sample
dates. Each textbox corresponds to a particular parameter and a particular date.
You can verify what parameter a particular textbox belongs to by hovering
your mouse over the textbox. The following actions can be performed for each sample:
- Enter any numerical value that is under 12 characters in length.
- Enter the < or > sign directly into the textbox (i.e. < 0.05)
- Enter a comment/note against a specific DMR value. To do this, click on the
next to the textbox that you want to add a comment/note to.
- Qualifier codes can be selected from the dropdown list, and the actual detection and
quantitation levels used and reported by the lab should be entered in the
corresponding boxes.
- Actions -
This section contains all of the actions you can perform against the DMR. The following
options are available:
- Save - Save what you are currently working on and stay on the screen.
- Save and Done - Save what you are working on and go back to the DMR search
screen.
- Next Outfall - If the DMR has more than one outfall, save the current screen
and move to the next outfall.
- Previous Outfall - If the DMR has more than one outfall, save the current
screen and move to the previous outfall.
- Validate - Run the validation routine to see what types of message will come
up.
- Cancel - Don't save any changes on the current screen and go back to the
DMR search screen.
- Clear - Clear all values associated with this DMR and reset the DMR status
to "Not Started".
|
Return to Top
|
Save a DMR
|
There are two ways to save your progress on a DMR. They are:
- Click on the "Save" button located at the bottom of the DMR data entry screen. Or
- Click on the "Save and Done" button located at the bottom of the DMR data entry
screen.
The "Save" button will save the content on the page and leave you on the page to
do some more work. The "Save and Done" button will save the content on the page
and take you back to the DMR search page.
|
Return to Top
|
Validate a DMR
|
When validating a DMR the following items are evaluated:
- Errors - Invalid characters, out of bound numeric values (i.e. pH above 14),
etc.
- Violations - Limit exceedances, missing values, etc.
- Warnings - Items that might cause a violation based on previous DMRs.
- Informational - Items that are reminders or for your information (FYI).
There are two ways that you can run a DMR validation check. They are:
- Click on the "Validate" button located at the bottom of the DMR data entry screen.
Or
- Check the "Mark as Ready to Submit" check box and then click on the "Save" or "Save
and Done" button located at the bottom of the DMR data entry screen.
The "Validate" button option is a voluntary way to execute the validation routine.
By voluntarily validating your DMR, you can catch and fix any errors as you enter
data.
The "Mark as Ready to Submit" check box and then click on the "Save" or "Save and
Done" button option will run the validation routine for you automatically. You cannot
submit a DMR that has errors in the validation report.
|
Return to Top
|
Clear a DMR
|
From the DMR data entry page, click on the "Clear" button located at the bottom
of the page. Click Ok on the message box that pops up to confirm your action. Then
click on the "Cancel" button located next to the "Clear" button to return to your
DMR search screen.
By clicking on the "Clear" button, you are deleting all of the DMR values entered
for the selected DMR across all of the active outfalls. You are also resetting the
DMR status to "Not Started".
|
Return to Top
|
Bulk Upload DMR Data (XML)
|
The XML bulk-upload DMR data option is intended for those facilities
that use their own computer program(s) to capture/store monitoring data and have a
large amount of data to collect and report.
The XML bulk upload takes an XML data file and uploads all information supplied
into a specified DMR. It validates the XML file for technical errors during the
loading process and it also validates your DMR for submission (possible violations).
It takes the data supplied in the XML file and loads the data that you have supplied into the
corresponding textboxes, drop downs, and note fields contained on the DMR data entry form. Please verify your data once it has been
loaded and before you submit.
To use this feature, please follow the instructions below:
- Click on the "Bulk Import" tab from the home page.
- Select the radio button for "Download limits for mapping".
- Click on the "Continue" button.
- Select the permit you want to receive mapping information for.
- Click on the "Download" button.
- Save the file to your computer. This file will be in the mapping file schema.
- Use the information in the mapping file to map all of your DMR values to a corresponding limit value id.
- Generate a DMR data file based on the upload schema.
- Click on the "Bulk Import" tab from the home page.
- Select the radio button for "Upload a bulk DMR data file".
- Click on the "Continue" button.
- Click on the "Browse..." button.
- Find and select your file for upload. (15MB or less)
- Click on the "Upload File" button.
- Click on the "Finish Import" button after the file has processed.
- Click on the "Sign Ready DMRs" button only if ready to sign DMR(s).
Notes:
Some things to note about this process:
- You only have to perform steps 2 - 7 once (unless your permit changes).
- One person at your facility can have the responsibility to upload the data and another person sign and submit the DMRs.
- Only facilities that can consume and generate XML files can use this process. Ecology also developed a
copy/paste bulk feature
for permittees use spreadsheets.
- If you have errors when you upload a data file, the system will not display the "Finish Import" button.
For more information on reporting codes and their descriptions, please see the reporting codes help page.
For more information on stormwater BMP codes and their descriptions, please see the additional bulk upload documentation.
For more information about the upload process and
mapping file process, please use the links.
|
Return to Top
|
Bulk Upload DMR Data (Copy/Paste)
|
The copy/paste bulk upload DMR data option is for permittees that have a large amount
of data to collect and report, but doesn't necessarily have a large computer program
to capture it with. These permittees often use Microsoft Excel to format and report their data.
The copy/paste bulk upload is just a copy/paste. It doesn't validate your DMR for submission. It just loads the
data that you have supplied into the corresponding textboxes. Your spreadsheet should match the DMR data entry form for
parameter/column order to ensure that your data is loaded into the correct parameter. Please verify your data once it has been
loaded.
To use this feature, please follow the instructions below:
- From the home page, Click on the "My Permits/DMRs" tab.
- Search for the permit that the desired DMR is associated with.
- Click on the "DMRs" link in the permit row.
- Click on the "Edit" link for the DMR that you want to load data for.
- Click on the "Paste Data From Excel" link.
- Open your spreadsheet document.
- Make sure your parameters and samples are in the same column order as your DMR data entry
screen for this outfall.
- Make sure the first column of your spreadsheet document contains the sample date for each
day.
- Select/copy the range of spreadsheet data to paste.
- Paste your copied data into the textbox. It should appear tab delimited.
- Click on the "Load Data" button.
The data that is pasted into the textbox should be tab delimited (have a tab separating the columns of
numbers). The following things will happen to the data in the textbox:
- Split into lines for each date supplied. (You do not have to supply every date during the monitoring period.
Just the dates that you have samples for.)
- Then each line will be split into separate samples.
- Verify first column to be a date in the monitoring period. Rows will be skipped if date is invalid.
- Rows will be skipped if there is no date supplied in the first column.
- Load data into data entry textbox that represents the associated date and parameter column.
- Additional columns will be ignored if they don't map to a parameter.
Notes:
Some things to note with data pasting:
- Hidden columns in your spreadsheet will not be copied when you select a range
of cells to copy.
- Qualifier codes (<, >, etc.) should be entered in the same cell as your number on
your speadsheet. Example: "<3" not "< (tab) 3"
- You can leave a cell blank in a row if you don't have a sample to report for that
parameter, but have a sample for another parameter.
- If you are having issues copying cells that have formula calculated values (Example: =AVG(A1:A30)), then try one of these methods:
- Copy the values into notepad first. Then copy the notepad values into the textbox.
- (In MS Excel) You can also select the range of cells, right click and select "Paste Special" from the menu. Then
select the "Values" radio button and click the "Ok" button. This will copy only the values for you to paste.
Example:
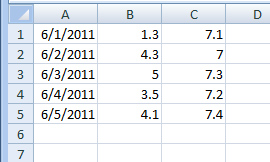
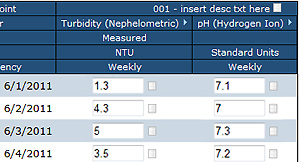
In the screen prints below you will notice that the first column in the spreadsheet corresponds to the date column on the
DMR data entry form. You should also notice that the second column in the spreadsheet corresponds to the turbidity parameter
(first parameter) on the DMR data entry form. Remember, all of the dates for a given monitoring period do not need to be present
in the spreadsheet to load data (only dates that samples we obtained), but all columns (parameters) should be represented in the
spreadsheet.
DMR Data in Spreadsheet
|
DMR Data Entry screen
|
|
Return to Top
|
Bulk Upload DMR Data - Single Sample (Copy/Paste)
|
The copy/paste bulk upload DMR data - single sample option is for permittees that have a large amount
of data to collect and report (generally priority pollutant data), but doesn't necessarily have a large computer program
to capture it with. These permittees often use Microsoft Excel to format and report their data.
The copy/paste bulk upload is just a copy/paste. It doesn't validate your DMR for submission. It just loads the
data that you have supplied into the corresponding textboxes. Your spreadsheet should match the DMR data entry form for
parameter/row order to ensure that your data is loaded into the correct parameter. Please verify your data once it has been
loaded.
To use this feature, please follow the instructions below:
- From the home page, Click on the "My Permits/DMRs" tab.
- Search for the permit that the desired DMR is associated with.
- Click on the "DMRs" link in the permit row.
- Click on the "Edit" link for the DMR that you want to load data for.
- Click on the "Paste Data From Excel" link.
- Open your spreadsheet document.
- Make sure your parameters and samples are in the same row order as your DMR data entry
screen for this outfall (previous screen).
- Make sure the first cell (row 1, cell 1) of your Excel document contains the sample date.
- Select/copy the range of spreadsheet data to paste.
- Paste your copied data into the textbox. It should appear tab delimited.
- Click on the "Load Data" button.
The data that is pasted into the textbox should be tab delimited (have a tab separating the columns of
numbers). You should have at most five columns of information to report. The following things will happen to the data in the textbox:
- Split into lines for each parameter supplied. (You need to supply a row for every parameter listed.)
- Then each line will be split into separate columns for sample, qualifier, actual detection level, and actual quantitation level.
- Verify first cell (row 1, column 1) to be a date in the monitoring period. All data will be skipped if the date is invalid.
- Load data into data entry textbox that represents the associated parameter row.
- Additional columns and rows will be ignored if they don't map to a parameter or column.
Notes:
Some things to note to help with data pasting:
- Hidden columns in your spreadsheet will not be copied when you select a range
of cells to copy.
- Your first row (parameter) of data should begin on row two of your spreadsheet.
- You can leave a row blank if you don't have a sample to report for that
parameter, but have a sample for the next parameter.
- You don't have to supply all of the columns (five). If you only have samples and qualifiers, it is ok
to just copy three columns worth of data.
Example:
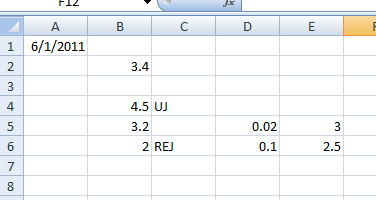
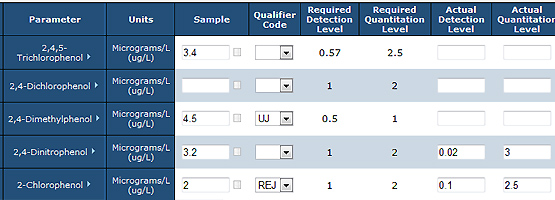
In the screen prints below you will notice that the first cell (row 1, column 1) in the spreadsheet corresponds to the sample date (not shown) the
DMR data entry form. You should also notice that the second row in the spreadsheet corresponds to the 2,4,5-Trichlorophenol parameter
(first parameter) on the DMR data entry form. Remember, all rows (parameters) should be represented in the
spreadsheet, but all columns don't have to be supplied. The two mandatory columns are the first two (date and sample), the rest
are optional.
DMR Data in Excel
|
DMR Data Entry screen
|
|
Return to Top
|
Receive a DMR due email reminder
|
To receive a DMR email reminder 7 days before the DMR is due:
- From the home page, Click on the "My Permits/DMRs" tab.
- Search for the permit that you want a reminder for.
- Click on the "Remind Me" link in the permit row.
While this options is activated, you will receive an email 7 days before a DMR is
due.
|
Return to Top
|
Stop receiving a DMR due email reminder
|
To stop receiving the DMR email reminders:
- From the home page, Click on the "My Permits/DMRs" tab.
- Search for the permit that you want a reminder for.
- Click on the "Stop Reminder" link in the permit row.
This will turn off the automated email reminders, but please be aware that you might
have other reminders turned on. So check all permits to make sure your reminders
are off.
|
Return to Top
|
Search for a DMR
|
To locate a particular DMR:
- From the home page, Click on the "My Permits/DMRs" tab.
- Search for the permit that the desired DMR is associated with.
- Click on the "DMRs" link in the permit row.
- Enter a monitoring period, DMR status, and/or DMR Type to search on.
- Click on the "Search" button.
You may need to widen (less search criteria) or narrow (more search criteria) to
find what you are looking for. Remember the next month's or quarter's DMR is not
created until the first day of the new monitoring period.
|
Return to Top
|
View a DMR
|
To view a particular DMR:
- From the home page, Click on the "My Permits/DMRs" tab.
- Search for the permit that the desired DMR is associated with.
- Click on the "DMRs" link in the permit row.
- Enter a monitoring period (or DMR status or both) to search on.
- Click on the "Search" button.
- Click on the "View" link in the DMR row of interest.
When you view a DMR that has not been submitted yet, a new window will open to display
the DMR with any values that have been entered already.
When you view an already submitted DMR, a new window will open with a list of all
of the documents sent for that submission. This includes all attachments that were
added to the DMR. Just click on the "Review" button for the document you want to
view.
If the DMR that you want to view has already been submitted, then the DMR that you
view will be the latest version. If you have multiple submitted versions of a DMR,
then you need to use the "Submission History" tab if you want to view older versions.
|
Return to Top
|
Print a blank DMR
|
To print a blank DMR:
- From the home page, Click on the "My Permits/DMRs" tab.
- Search for the permit that the desired DMR is associated with.
- Click on the "DMRs" link in the permit row.
- Enter a monitoring period (or DMR status or both) to search on.
- Click on the "Search" button.
- Click on the "View" link in the DMR row of interest (the DMR must have a DMR status
of "Not Started").
In order to print a blank DMR, the DMR must have a DMR status of "Not Started".
If the DMR you want does not have this status, then you can clear the DMR and then
print a blank DMR.
When you go to print a blank DMR, a new window will open to display the DMR. Click
on the print icon
 in the report toolbar. You can also export the DMR to a PDF form by using the "Export"
drop down list and link in the report toolbar.
in the report toolbar. You can also export the DMR to a PDF form by using the "Export"
drop down list and link in the report toolbar.
If you do not see the print button, please use the export option (PDF) to obtain a printable copy of this report.
|
Return to Top
|
Submit a DMR
|
Only Facility Coordinator and Facility Signer user roles can electronically submit
DMR. Also, your electronic signature account must be verified and active before
you can submit and sign a DMR. To submit and sign on DMR at a time:
- The DMR you want to submit must be marked as "Ready to Submit".
- Find and open the DMR of interest.
- Scroll to the bottom of the data entry page.
- Check the "Mark as Ready to Submit" check box.
- Click on the "Save" or "Save and Done" button.
- Correct any errors that result from the validation routine and resave.
- Check the check box under the "Submit" column on the DMR Search page.
- Click on the "Sign Selected DMRs" button.
- Review the DMRs to be signed. You may remove DMRs from this list if you feel they
are not ready.
- Click on the "Continue" button.
- If you have notifications to send, verify your email notifications and click on
the "Continue" button.
- Click on the "Log into Signature Account" button.
- Complete the electronic signature log on process and click the "Done Viewing" button.
- Click on the "Ready to Sign" button.
- Read the certification attestation and check the certification check boxes.
- Click on the "Sign" button.
You can also submit multiple DMRs (across multiple permits) at once by clicking
on the "Sign my ready DMRs now" link located on the home page. This capability can
also be accessed from the "Sign Ready DMRs" button located on the bottom of the
"My Permits/DMRs" tab. Both options will take you straight to the DMR Review page.
|
Return to Top
|
Re-submit a DMR
|
If you need to make a correction to an electronically submitted DMR, follow these
steps:
- From the home page, Click on the "My Permits/DMRs" tab.
- Search for the permit that the desired DMR is associated with.
- Click on the "DMRs" link in the permit row.
- Enter a monitoring period (or DMR status or both) to search on.
- Click on the "Search" button.
- Click on the "Revise" link in the DMR row of interest (the DMR must have a DMR status
of "Submitted").
- Click "Ok" on the pop up message box.
- You will be directed to the DMR data entry screen with all of your data from the
previously submitted DMR.
- Make your changes and submit your DMR as specified in the "Submit a DMR" section
on this page.
If you need to make a correction on a DMR that you sent in by paper, you will have
to submit (mail) a new paper copy of your DMR to the Washington State Department
of Ecology region you originally submitted to. Once a DMR is submitted by paper
it has to remain as a paper transaction. Once it is submitted through WQWebDMR,
then it has to remain as an electronic transaction.
|
Return to Top
|
Calculate DMR summary values
|
If you have DMR summary values on your DMR form, then this handy feature can help calculate some of those values
for you. This feature can be accessed by clicking on the "Calculate My Summary Values" link located in the "Summary Data" section
on the DMR data entry form. The following statistical base types can be calculated by WQWebDMR:
- Average (only when numerical values are reported for daily values and units do not say "Percent")
- Geometric Mean (only when numerical values are reported for daily values)
- Maximum
- Minimum
- Total
All statistical base types that include weekly calculations (weekly average, 7-day geometric mean, etc.) can not be calculated by WQWebDMR
due to the complexity and specifics of each permit. The complete list of statistical base types that can not be calculated by WQWebDMR are:
- 7-Day Median
- 7-DADMax
- Daily Average
- Daily Maximum
- Daily Minimum
- Instantaneous Maximum
- Instantaneous Minimum
- Seasonal Average
- Total, Daily
- Weekly Average
- Weekly Geometric Mean
- Weekly Maximum
All existing summary values displayed on the DMR data entry form will be deleted when the "Calculate My Summary Values" process is started. Any
statistical base type that can not be calculated during this process will be left blank. Any
blank summary value textbox will need to be populated by the user before the DMR can be submitted. Blank summary value textboxes
will result in technical errors in WQWebDMR if they are not filled in.
Please verify all calculated summary values before submitting your DMR. If the calculated value does not match the value you have
calculated yourself, you can type over the value in the textbox.
|
Return to Top
|
Validate a DMR as a System Administrator
|
|
A WQWebDMR System Admin can validate a DMR by its ID through the system administration UI. This follows the normal rules preventing a DMR from being validated after being signed and transferred to PARIS.
|
Return to Top
|
Search for a Permit
|
To find a particular permit that you have access to, you need to:
- From the home page, Click on the "My Permits/DMRs" tab.
- Enter a permit number, a facility name, facility address, or select a permit type.
You may have multiple search criteria fields populated if you like.
- Click on the "Search" button.
You may need to widen (less search criteria) or narrow (more search criteria) to
find what you are looking for. If all else fails, you can leave all of the search
criteria boxes blank and just click on the "Search" button. This will return all
permits that you have access to. Remember if you don't have access to a certain
permit it will not show up in your permit search.
|
Return to Top
|
View permit details
|
To view a particular permit's high level details, you need to:
- From the home page, Click on the "My Permits/DMRs" tab.
- Enter a permit number, a facility name, facility address, or select a permit type.
You may have multiple search criteria fields populated if you like.
- Click on the "Search" button.
- Click on the "View" link in the permit row of interest.
For more detailed permit information, please see a copy of your permit and fact
sheet.
|
Return to Top
|
Set up permit notifications
|
Notifications are a way to let outside people know that you submitted a DMR to Washington
State Department of Ecology. In order to set up notifications, you need to:
- From the home page, Click on the "My Permits/DMRs" tab.
- Enter a permit number, a facility name, facility address, or select a permit type.
You may have multiple search criteria fields populated if you like.
- Click on the "Search" button.
- Click on the "Notifications" link in the appropriate permit row.
- When the pop up window appears, enter a name to associate with the email.
- Enter a valid email address.
- Check the "Send Notification" check box so the person will receive emails.
- Click on the "Add" link.
These notifications are considered a default set up. Each time you submit a DMR
through WQWebDMR, you will be asked if you want to modify who gets a notification
and who doesn't.
A person can be set up as a notification and have a "Send Notification" status of
"No", so you can save multiple emails.
|
Return to Top
|
View inactive permits
|
A permit is renewed every five years. When this occurs, the current version of the
permit is marked inactive and a new version is created. In order to view your inactive
permits, you need to:
- From the home page, Click on the "My Permits/DMRs" tab.
- Enter a permit number, a facility name, facility address, or select a permit type.
You may have multiple search criteria fields populated if you like.
- Check the check box labeled "Show Inactive Permits".
- Click on the "Search" button.
Your permit number will be displayed in the search results below with one or more
inactive permit versions available for viewing (depending on years of coverage or
major modifications).
All DMRs associated with a particular permit version's effective and inactive dates
will be with that permit version
|
Return to Top
|
Add a monitoring point
|
(Construction Stormwater permits only) To add a new monitoring
point, you need to:
- From the home page, Click on the "My Permits/DMRs" tab.
- Search for the permit that the desired DMR is associated with.
- Click on the "DMRs" link in the permit row.
- Click on the "Monitoring Points" tab.
- Click on the "Add Monitoring Point" button.
- Enter information in the following fields:
- ID - 4 character unique identifier for the point.
- Description - 50 character description or name of the point.
- Receiving Waterbody - The outfall that the monitoring point is associated with.
- Effluent Type - Whether the water sampled is flowing in or out of the facility.
- Sample Matrix - The medium that the sample will be taken from.
- Effective Date - The date the monitoring point will activated. Must be the first
of the month (i.e. 3/1/2009).
- Inactive Date - The date the monitoring point is no longer active.
- Notes - 1000 characters to add any special notes about the monitoring point.
- Click on the "Next" button.
- Use your mouse to click on point on the map to represent your monitoring point.
- Click on the "Save" button.
In order to create monitoring points for past dates, your DMRs must be in a "Not
Started" DMR status. You cannot add monitoring points to already started DMR.
All monitoring point must start on the first of the month and must end on the last
day of the month. A DMR must be active for at least one month before it can be marked
as inactive.
|
Return to Top
|
Edit a monitoring point
|
(Construction Stormwater permits only) As long as a monitoring
point is considered active, it can be edited. All monitoring point properties can
be edited while the effective date is still in the future. Once the effective date
has passed, then only a few properties can be edited. To edit a monitoring point:
- From the home page, Click on the "My Permits/DMRs" tab.
- Search for the permit that the desired DMR is associated with.
- Click on the "DMRs" link in the permit row.
- Click on the "Monitoring Points" tab.
- Click on the "Edit" link in the monitoring point row of interest.
- Edit your monitoring point properties.
- If the effective date has passed, click on the "Save" button and you are finished.
- If the effective date hasn't passed, click on the "Next" button.
- If the blue square is where your monitoring point is located, then click on the
"Save" button.
- If you need to move the monitoring point, click on the map to select a new point,
then click on the "Save" button.
Non-Basic monitoring points for Construction SW GP permit types cannot be edited. Please contact your permit writer for changes.
|
Return to Top
|
Delete a monitoring point
|
(Construction Stormwater permits only) As long as the effective
date for the monitoring point hasn't passed, then you can delete a monitoring point.
To delete a monitoring point, you need to:
- From the home page, Click on the "My Permits/DMRs" tab.
- Search for the permit that the desired DMR is associated with.
- Click on the "DMRs" link in the permit row.
- Click on the "Monitoring Points" tab.
- Click on the "Delete" link in the monitoring point row of interest.
- Click on the "Ok" button on the pop up message.
Non-Basic monitoring points for Construction SW GP permit types cannot be deleted. Please contact your permit writer for changes.
|
Return to Top
|
Reactivate a monitoring point
|
(Construction Stormwater permits only) To reactivate an already
existing monitoring point:
- From the home page, Click on the "My Permits/DMRs" tab.
- Search for the permit that the desired DMR is associated with.
- Click on the "DMRs" link in the permit row.
- Click on the "Monitoring Points" tab.
- Click on the "Reactivate" link in the monitoring point row of interest.
- Edit the available monitoring point properties.
- Click on the "Save" button.
Non-Basic monitoring points for Construction SW GP permit types cannot be reactivated. Please contact your permit writer for changes.
|
Return to Top
|
Using the map
|
(Construction Stormwater permits only) The interactive map
is only available when you are entering a new monitoring point or editing one that
hasn't become active yet (future effective date). To select a point on the map,
you need to:
- If the pencil tool is not highlighted, click on the
 button in the map toolbar.
- Click on the map to select your point (yellow crosshair is a select point).
- Click on the "Save" button to complete the monitoring point.
The map should automatically center on your facility, which will be marked by a
red diamond. You should also be able to see the receiving water body point that
you selected, which will be marked by a purple circle.
You may also choose to move around the map by selecting the
 button in the map toolbar. This button will allow you to pan around the map, use
the zoom slider bar, and display detail information. To view the detail information,
click on the map with the pan tool and a message box will appear with the detailed
map information for that point.
button in the map toolbar. This button will allow you to pan around the map, use
the zoom slider bar, and display detail information. To view the detail information,
click on the map with the pan tool and a message box will appear with the detailed
map information for that point.
The map also has some searching capabilities. You may find other locations by map
layer, address, or latitude and longitude. To do this:
- Click on the "Search" link in the map toolbar.
- Click on the
 to expand the search criteria you want to use.
- Enter your search criteria.
- If you would like to select the found point at the same time, check the "define
location" check box before searching.
- Click on the "Find" button.
If you have moved the map around so much and have lost your selected facility icon,
you can click on the
 button to be re-centered around your facility.
|
Bulk Upload Monitoring Points (Construction Stormwater only)
|
The XML bulk monitoring point upload option is for permittees that have a large amount
of data to collect/report for construction stormwater permits and have their own large computer program
to capture/store monitoring data. This is only for Construction Stormwater permittees only.
The XML bulk monitoring point upload takes an XML data file and updates monitoring points with the information provided. It does validate your file
technical errors during the loading process, so you will not be able to complete the upload if your file has errors. Please verify your new or updated monitoring points once they have been
loaded and before you proceed with any DMR data upload.
To use this feature, please follow the instructions below:
- From the home page, Click on the "Bulk Import" tab.
- Select the radio button for "Download limits for mapping".
- Click on the "Continue" button.
- Select the permit you want to receive mapping information for.
- Click on the "Download" button.
- Save the file to your computer. This file will be in the mapping file schema.
- Use the information in the mapping file to map all of your outfalls and existing monitoring points.
- Generate a monitoring point upload file based on the upload schema.
- From the home page, Click on the "Bulk Import" tab.
- Select the radio button for "Upload bulk monitoring point updates".
- Click on the "Continue" button.
- Click on the "Browse..." button.
- Find and select your file for upload. (15MB or less)
- Click on the "Upload File" button.
- After the file has processed, click on the "Finish Import" button.
Notes:
Some things to note about this process:
- Steps 2 - 7 only have to be done once (unless your permit changes).
- The same person that uploads DMR data can upload monitoring point changes.
- This process is only designed for permittees that can consume and generate XML files.
There is a add monitoring point
and edit monitoring point feature
for permittees that only have a few monitoring points.
- Monitoring point must be have an active date that is set to the first day of a reporting month.
- Monitoring point must have an inactive date that is set to the last day of a reporting month.
For more information about the monitoring point upload process, please use the links.
|
Return to Top
|
Return to Top
|
Add an attachment
|
To add a file attachment to your DMR before submission:
- From the home page, Click on the "My Permits/DMRs" tab.
- Search for the permit that the desired DMR is associated with.
- Click on the "DMRs" link in the permit row.
- Search for the DMR that you want to attach the file to.
- Click on the number (i.e. 0, 1, 2...) link under the "Attachments" column.
- In the textbox, enter a name or description to associate with the file.
- Find your file using the "Browse" button.
- Click on the "Load Selected Item" button.
The following file types may be attached: ".xlsx", ".docx", ".txt",
".gif", ".jpeg", ".jpg", ".bmp", ".pdf", ".tif"
Please only attach files that are related to your DMR (example: lab sheets).
|
Return to Top
|
View DMR submission history
|
To view an already submitted DMR or a DMR's submission history (multiple versions):
- From the home page, Click on the "My Permits/DMRs" tab.
- Search for the permit that the desired DMR is associated with.
- Click on the "DMRs" link in the permit row.
- Click on the "Submission History" tab.
- Enter a submission start and end date to search within. This is the date the DMR
was actually submitted, not the DMR due date.
- Click on the "Search" button.
- Click on the "View" link for the DMR version you want.
- Click on the "Review" button next to the document you want to view.
|
Return to Top
|
Activate a SAW user
|
In order to activate a new user request, you need to:
- From the home page, Click on the "Administration" tab.
- If the new user doesn't appear in the pre search results, search for the user by
user credential, email address, name, or account status.
- Click on the "Edit" link in the user's row.
- Click on the "User Detail" tab.
- Change the "Account Status" drop down to say active.
- Click on the "Save" button.
- Click on the "Back" button to return to the previous screen.
|
Return to Top
|
Add permits to a user
|
To add more permits to a user, you need to:
- From the home page, Click on the "Administration" tab.
- Search for the user by user credential, email address, name, or account status.
- Click on the "Search" button.
- Click on the "Edit" link in the user's row.
- Click on the "Assign New Permit" tab.
- Search for the permit by permit number, permit type, facility name, or facility
address.
- Click on the "Search" button.
- Select a user role from the "User Role" drop down list that is related to the permit
you want.
- Click on the "Assign" link next to the drop down list.
- Click on the "Back" button to return to the previous screen.
|
Return to Top
|
Remove permits from a user
|
To remove a permit from a user, you need to:
- From the home page, Click on the "Administration" tab.
- Search for the user by user credential, email address, name, or account status.
- Click on the "Search" button.
- Click on the "Edit" link in the user's row.
- Click on the "Assigned Permits" tab.
- Click on the "Remove" link in the permit row to remove.
- Click on the "Back" button to return to the previous screen.
|
Return to Top
|
Update a user's role per permit
|
To update a user's role for a specific permit, you need to:
- From the home page, Click on the "Administration" tab.
- Search for the user by user credential, email address, name, or account status.
- Click on the "Search" button.
- Click on the "Edit" link in the user's row.
- Click on the "Assigned Permits" tab.
- Select a user role from the "User Role" drop down list that is related to the permit
you want to change.
- Click on the "Update" link next to the drop down list.
- Click on the "Back" button to return to the previous screen.
|
Return to Top
|
|